The Essential Guide to T-Shirt Design Widths for Perfect Print-On-Demand Results
Whether you’re new to creating custom t-shirts or an experienced designer in the print-on-demand industry, nailing the right design width is crucial. A design that’s too wide can look stretched or overpowering, while one that’s too narrow may not stand out. This guide will provide everything you need to know about typical t-shirt design widths, from standard dimensions to expert tips on measuring and scaling for a balanced and appealing appearance.
What is T-Shirt Design Width?
The t-shirt design width is the horizontal measurement of your artwork as it will appear on the garment. For custom t-shirts, this measurement impacts how the design sits across the chest or back, impacting the overall style and readability. Ensuring a well-proportioned width is crucial for various printing methods—whether it’s, digital printing, transfer printing, and screen printing. Selecting the correct design width ensures a professional look that effectively connects with your audience.
Standard width for a perfect t-shirt design
When it comes to t-shirt designs, there’s no one-size-fits-all solution, but some general guidelines can help you achieve the perfect print. A design width of 10 to 12 inches typically works well for most adult t-shirts, while smaller widths of 4 to 8 inches are suitable for youth sizes.
For children’s t-shirts, designs should be compact to complement smaller garments, usually ranging between 2 to 6 inches in width. The key is ensuring the design feels proportionate to the shirt’s overall size, creating a balanced and visually appealing look.
Remember, the height of your design matters just as much as the width. Maintaining proportional dimensions ensures the artwork doesn’t look stretched or squished, keeping the design sharp and cohesive across all t-shirt sizes.
Key Factors to Consider for Optimal T-Shirt Design Width
Several factors influence the ideal width of a Typical T-shirt Design:
Shirt Size and Fit
Larger shirts can handle wider designs, while smaller shirts might need narrower widths to avoid looking too crowded. For fitted t-shirts, it’s usually best to place the design more centrally for a balanced appearance.
Design Complexity
Complex, detailed designs typically look better with a wider width to capture the intricate elements. Simpler or text-based designs can work well with a narrower width to maintain readability and style.
Printing Method
Design width also depends on the printing method. DTG printers can accommodate wider, full-color designs, while transfer printing is more cost-effective for moderate widths, especially with multi-color designs.
Popular T-Shirt Design Widths by Style
To help you find the right fit, here are some common design widths used across different styles:
- Chest Logos: 3-4 inches wide for a subtle left-chest logo.
- Text-Based Designs: 9-10 inches wide for optimal readability.
- Full-Width Graphics: 11-12 inches wide for bold, impactful designs.
- Oversized/Streetwear Style: 13-14 inches wide to create a striking, oversized look.
These standard widths are great starting points but don’t hesitate to adjust them based on your unique design needs and brand style.
Tools & Techniques for Measuring and Scaling
To achieve the perfect fit for your t-shirt designs, you’ll need a few tools and techniques for measuring and scaling:
Design Software
Programs like Adobe Illustrator, Photoshop, or free options like GIMP allow you to set exact dimensions and visualize the design on a digital template before printing. This ensures precision and helps you make necessary adjustments early on.
Digital Templates
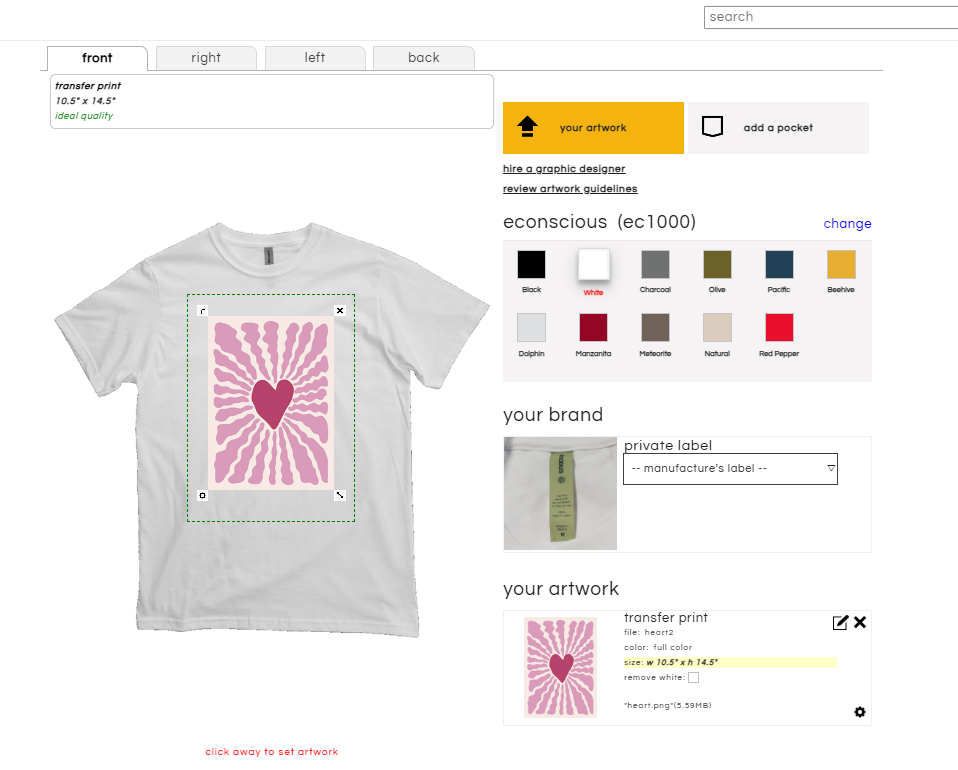
Many print-on-demand platforms and services offer t-shirt templates where you can adjust the design to see how it looks on a virtual shirt. This saves time and provides a realistic preview before committing to a final width.
Rulers & Measuring Tape
When working with a physical shirt, use a ruler or measuring tape to check how your design will look at different widths. This hands-on method helps ensure the design sits well on the garment and fits as intended.
Preview & Print Tests
Before a full production run, print a sample or use a preview feature. This allows you to see the actual size of your design and make any necessary adjustments before finalizing.
Tips for Perfect T-Shirt Design Widths
To wrap up, here are some final tips for achieving the ideal width of a typical t-shirt design:
- Start with Standard Widths: If you’re new to custom t-shirt design, beginning with standard widths is a safe and reliable approach.
- Adjust for Larger Sizes: For larger shirts, slightly increasing the width can help maintain visual balance and ensure the design looks proportionate.
- Seek Feedback: If designing for a brand or client, ask for feedback to ensure the width matches their preferences and expectations.
- Consider Shirt Color: Darker shirts often look better with wider, bolder designs, while lighter shirts can work well with smaller, more subtle graphics.

To wrap up, choosing the right custom t-shirt design width is essential for creating balanced, eye-catching custom apparel. Whether you’re aiming for a subtle logo or a bold graphic, understanding design dimensions can make all the difference in the final look. At Apliiq, we offer a variety of printing options to bring your designs to life. Allow us to address the maximum print size that Apliiq offers for t-shirts. Our digital printing service can handle designs up to 13.5″ wide by 15.5″ high, perfect for detailed, full-color prints. For those looking for an even larger impact, our jumbo transfer printing can accommodate sizes up to 14″ wide by 19″ high, ideal for oversized or streetwear-style designs. With these options, Apliiq ensures your designs not only look great but also meet the scale and style you envision. Happy designing!

